Creating a well-structured resume in Microsoft Word is fundamental for capturing the attention of potential employers. Among the keystones of crafting a compelling resume is the effective incorporation of sections. Sections organize information logically, allowing readers to quickly digest your qualifications and experiences. This article explores how to add sections to your resume in Word and provides formatting tips to enhance its overall presentation.
Understanding Resume Sections
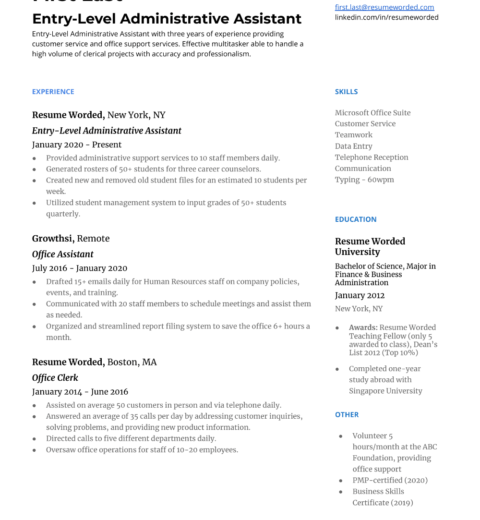
Before delving into the mechanics of formatting, it is imperative to understand what sections are typically included in a resume. Commonly, resumes comprise the following sections: Personal Information, Objective Statement or Summary, Education, Work Experience, Skills, and Additional Information (such as certifications or volunteer work). Each section serves a distinct purpose and should be clearly delineated to facilitate quick navigation.
Setting Up Your Document
When beginning to add sections to your resume, initiate by creating a new document in Microsoft Word. Adjust your margins to a standard of one inch; this configuration ensures that your resume retains a professional appearance when printed or viewed digitally. Opt for a clean, readable font such as Arial or Times New Roman, maintaining a font size between 10 to 12 points for the body text. This standard enhances readability, critical in making your resume accessible to hiring managers and applicant tracking systems (ATS).
Creating Section Headings
The first step in adding sections involves creating distinct headings for each section of your resume. To craft a section heading, type the title (e.g., “Work Experience”) and format it to stand out from the body text. Use a font size one or two points larger than the body text, and consider bolding it to increase its prominence. Additionally, employing a different color for section headings can add visual interest and help segregate information; ensure that the color remains professional, such as a dark blue or gray.
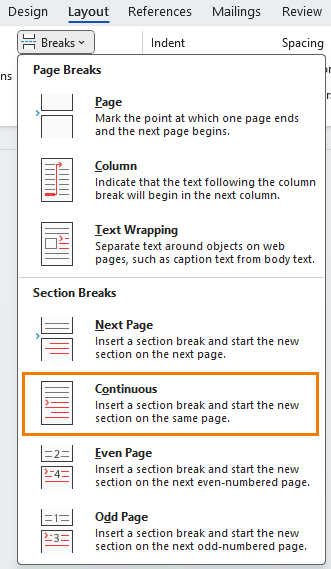
To insert a section heading in Word, follow these steps:
- Click on the location where you want the heading to appear.
- Type in your heading title.
- Select the text and apply the desired formatting using the toolbar options.
Utilizing Additional Formatting Tools
Once you have established your section headings, leverage paragraph formatting tools to create spacing that separates sections visually. Line spacing plays a crucial role in maintaining readability. For optimum clarity, set your line spacing to 1.15 or 1.5. Additionally, consider adding space before and after each section to create breathing room, which prevents the resume from appearing congested.
Another subtle yet effective technique involves adjusting the alignment of text within sections. For example, the headings should be aligned to the left, ensuring consistency with the rest of the document. Furthermore, align your body text uniformly to create a polished and professional aesthetic.
Incorporating Bulleted Lists
When detailing your work experience and skills, employing bulleted lists can significantly enhance the legibility of your resume. Lists allow potential employers to quickly ascertain key details without sifting through lengthy sentences. When creating bullet points, initiate with strong action verbs that encapsulate your responsibilities and achievements. For instance, instead of stating, “Responsible for managing a team,” consider phrasing it as “Led a team of five in project management, resulting in a 20% increase in efficiency.”
To insert a bulleted list in Word, click on the bullet icon in the toolbar or use the keyboard shortcut (Ctrl + Shift + L) to commence your bullet points. Ensure that each bullet point follows a parallel structure; for example, if you start with a verb, continue using verbs in subsequent points. This cohesive structure enriches the presentation of your competencies.
Section Order and Flow
The arrangement of sections on your resume merits careful contemplation. Typically, the order is as follows: Contact Information, Objective or Summary, Work Experience, Education, Skills, and Additional Information. This arrangement ensures that the most pertinent information is seen first, which is crucial in capturing attention swiftly.
Additionally, when contemplating deeper aspects of your resume’s flow, consider the narrative it weaves about your professional trajectory. A coherent flow not only makes your resume visually appealing but also reinforces the story you wish to communicate, linking your skills and experiences in a logical sequence.
Finalizing the Layout
After adding sections and formatting the content, take the time to review your layout. Check for any inconsistencies in font size, style, and spacing. A meticulous review helps to ensure that your resume not only reads well but is also visually pleasing. Print a copy or convert it to PDF to verify that the formatting remains intact and review its overall appearance.
Conclusion
Add sections to your resume in Word with intention and strategy. Each formatted section helps guide the reader through your narrative, presenting your qualifications methodically. By understanding and applying these formatting tips, you can significantly improve the aesthetic and functional quality of your resume. Ultimately, a well-organized and visually appealing resume may serve as your ticket to an interview and, potentially, your dream job.


